Small Bathroom Remodel Ideas That Maximise Space Without Moving Walls
1. Go Vertical: Clever Storage That Does Not Eat Floor Space
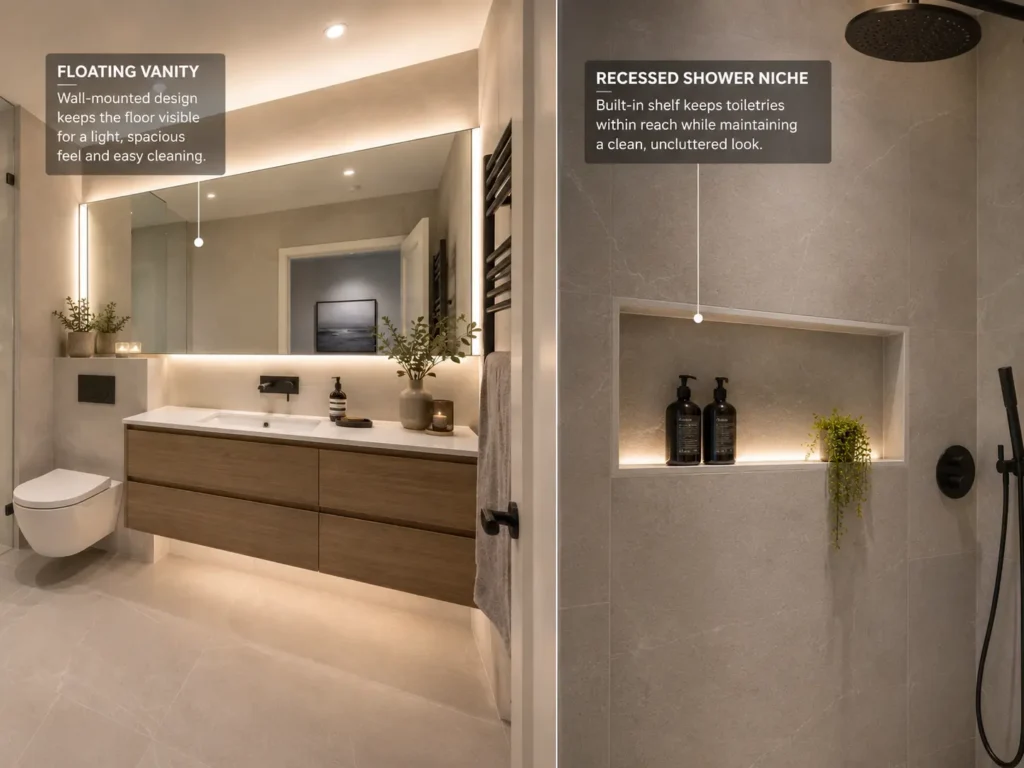
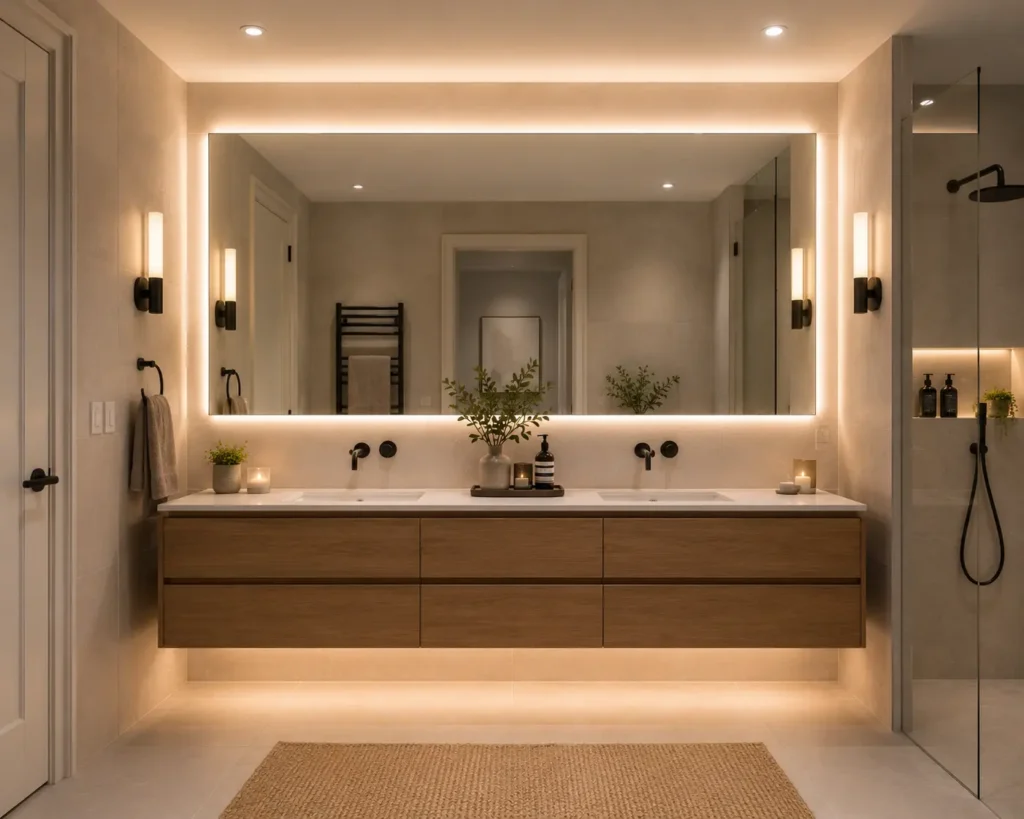
Tall slim cabinets that run floor to ceiling maximise the dead zone above head height. A 20-25 cm deep cabinet beside the toilet or in a corner can hold towels, cleaning products, and spare toiletries in a footprint smaller than a standard bath towel. Pair this with a mirrored cabinet above the sink for a double layer of storage that adds depth rather than bulk.
- Pro tip: Replace an open shelf beside the basin with a slim recessed medicine cabinet. You regain 10–15 cm of projection space and gain a mirror at the same time.
2. Mirrors and Lighting: The Fastest Way to Double a Room
3. Space-Smart Fixtures and Fittings That Work Harder
The fixtures you choose determine more than aesthetics – they define how the room functions and how much space you have left over for movement. In a small bathroom remodel, every centimetre matters, and the right product choices can reclaim surprising amounts of floor and wall space.
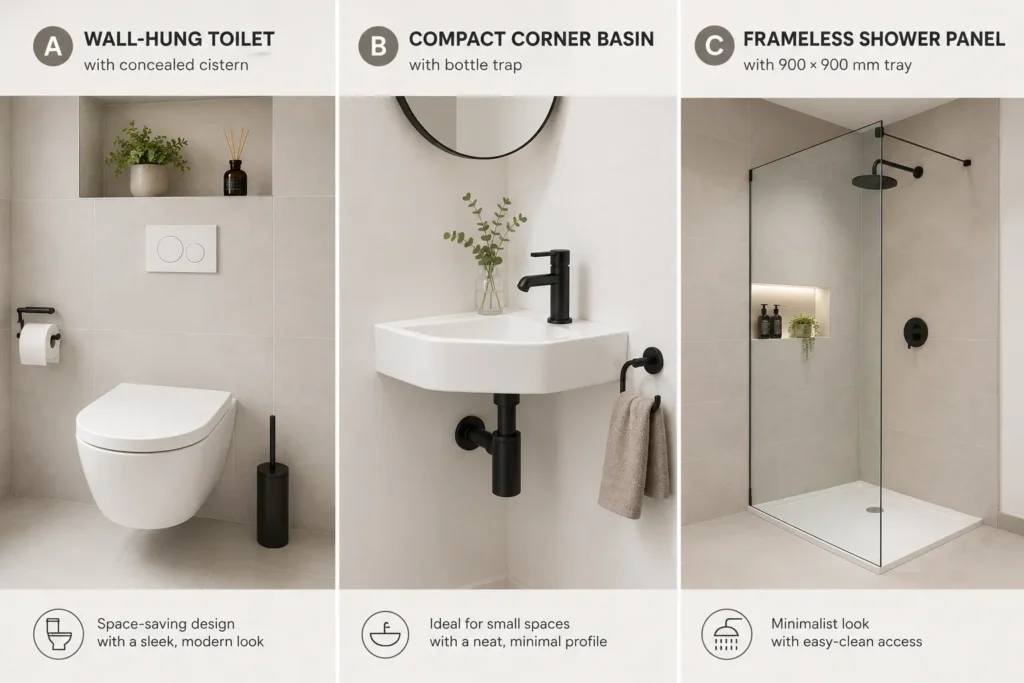
Toilets
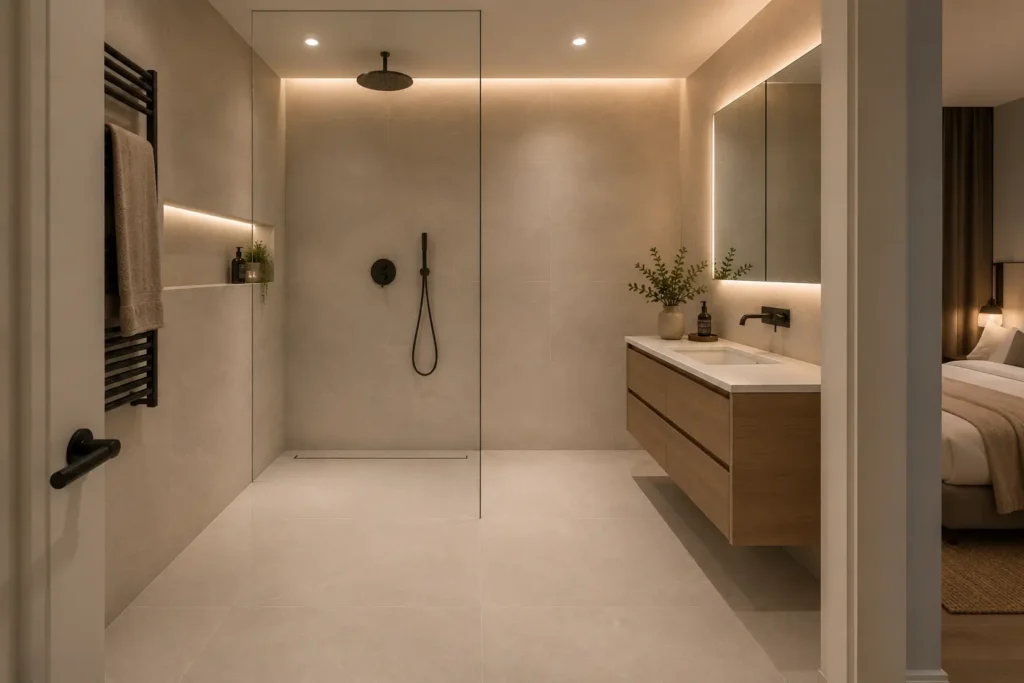
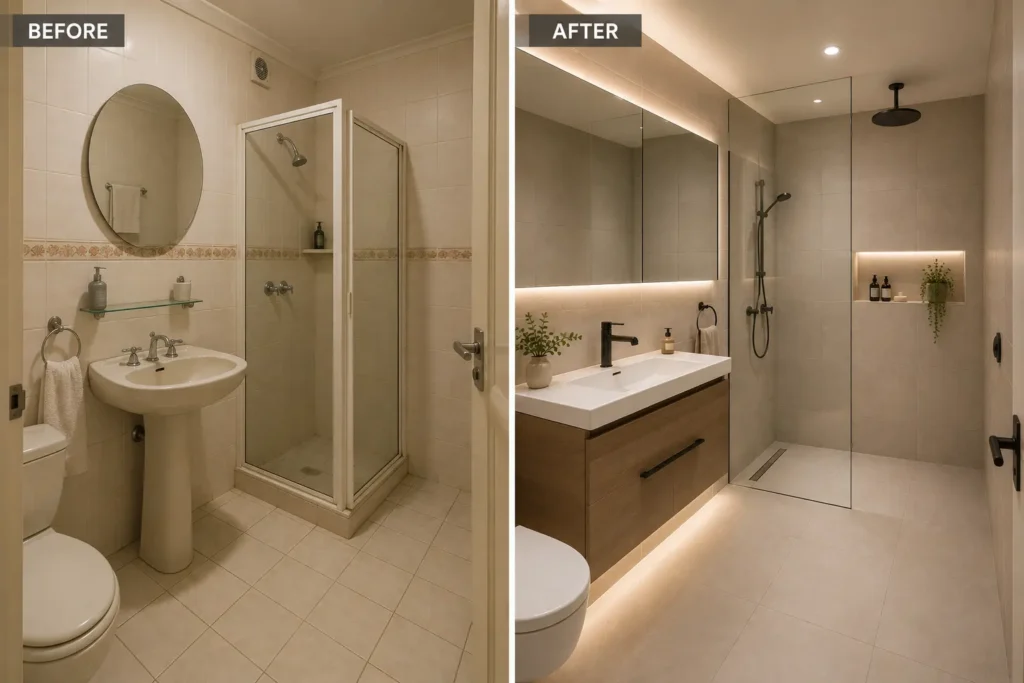
Wall-hung (back-to-wall) toilets are a game-changer in compact bathrooms. Because the cistern is concealed inside the wall cavity, you save 15-20 cm of floor depth compared with a standard close-coupled suite. That is enough extra clearance to walk comfortably past, or to fit a slightly wider vanity. Compact close-coupled toilets – sometimes called short-projection suites – are a more budget-friendly alternative, projecting as little as 60 cm from the wall.
Basins
Shower Enclosures
4. Tiles, Colour, and Visual Tricks That Change Everything
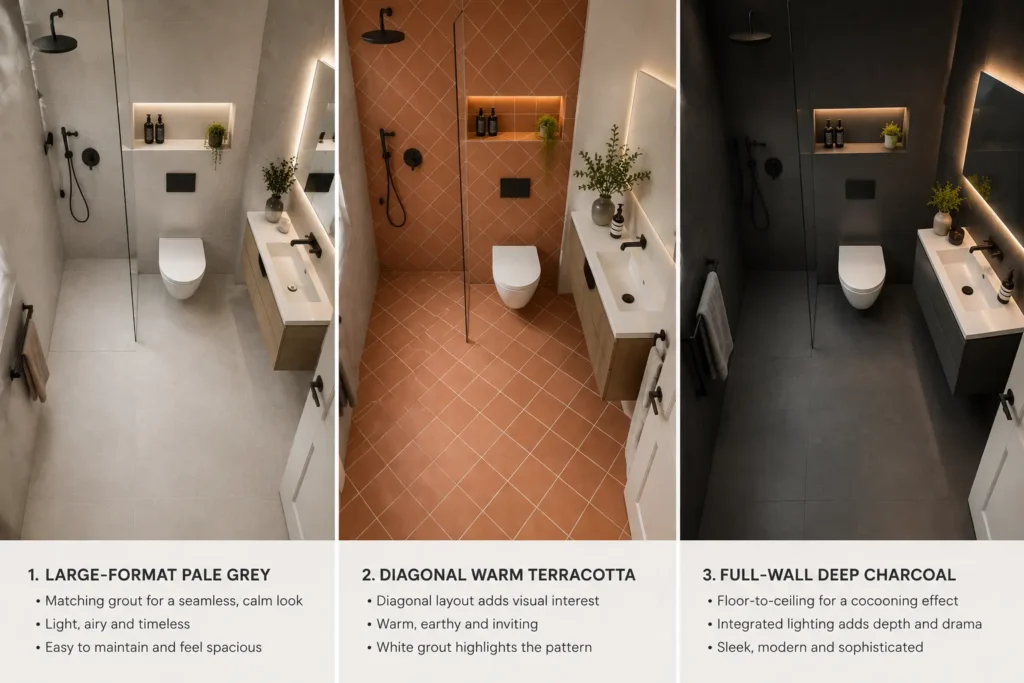
Large-Format Tiles
Tile Direction and Layout
Colour Strategy
5. Wet Room and Shower Upgrades: Maximum Impact, Minimum Footprint
6. Planning and Budgeting: Getting the Most from Your Remodel
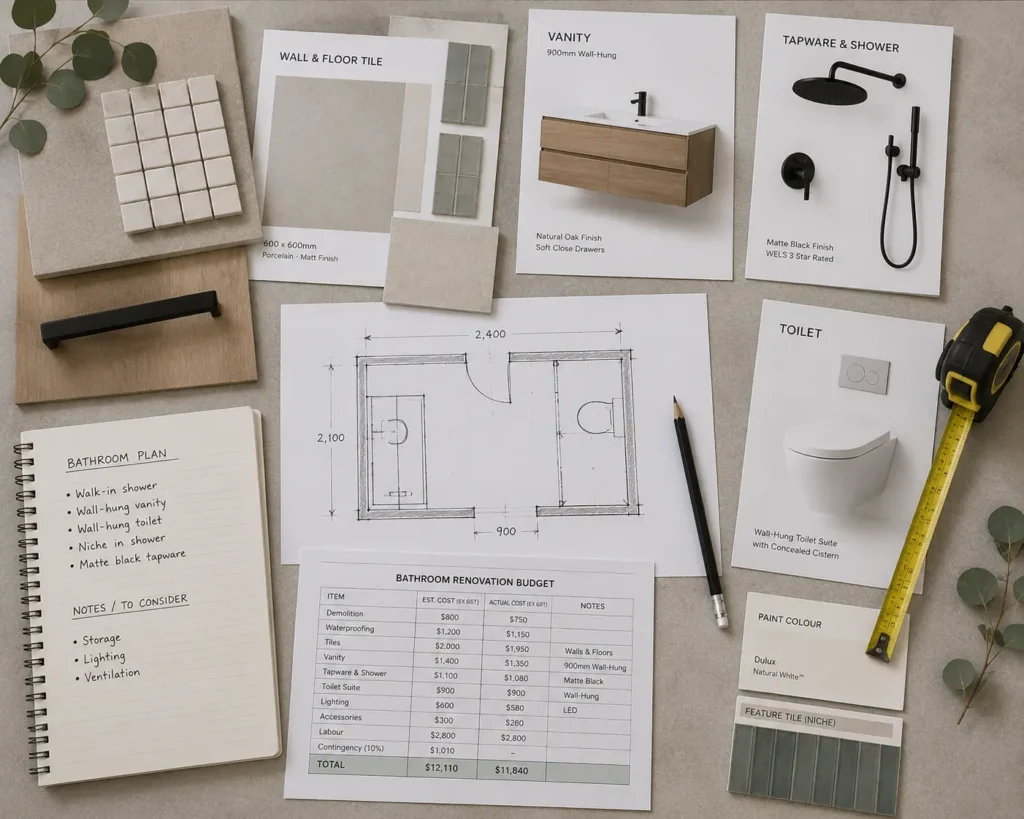
Set Your Priorities Before You Shop
- shower/bath zone and water-proofing
- tiles and floor
- vanity and mirror
- toilet
- lighting,
- accessories.
Keep Plumbing in Place
Get the Sequence Right
Where to Spend vs. Save
7. Ten Quick Wins You Can Do This Weekend
- Replace a small mirror with a full-width frameless one - this single change is transformative.
- Swap a standard showerhead for a rainfall or high-pressure alternative on the existing arm.
- Add peel-and-stick LED strips under the vanity and behind the mirror for layered lighting.
- Regrout floor tiles with a grout that matches the tile colour to reduce visual noise.
- Install a heated towel rail to free up the back of the door and add a luxury touch.
- Replace a pedestal basin with a compact wall-hung basin and floating shelf beneath it.
- Add a tension-rod shelf above the bath or inside the shower for extra storage at zero cost.
- Switch a hinged shower door to a sliding or pivot alternative to reclaim swing-space.
- Paint the ceiling the same colour as the walls to remove the visual "lid" on the room.
- Fit a soft-close toilet seat in a matching white - it costs under £30 and immediately lifts the finish of any bathroom.
Conclusion: Small Space, Big Potential
Frequently Asked Questions
Can I really make a small bathroom feel bigger without knocking down walls?
Yes – and most designers argue that layout-free remodels produce better results per pound spent than structural ones. The biggest gains come from mirrors, frameless glass, large-format tiles, and smart lighting. These changes affect how the eye reads the space, not the actual square footage.
How much does a small bathroom remodel typically cost in the US?
In the United States, the cost of a small bathroom remodel typically ranges from $5,000 to $15,000, depending on the scope of work, materials, and labor rates in your area.
- Basic refresh ($5,000–$8,000): New paint, fixtures, vanity, mirror, lighting, and minor updates while keeping the existing layout.
- Mid-range remodel ($8,000–$15,000): New flooring, vanity, toilet, shower or tub updates, quality tile, and upgraded finishes.
- High-end remodel ($15,000–$30,000+): Custom cabinetry, premium tile, luxury fixtures, wet room conversion, or significant plumbing and electrical work.
Is it worth replacing a bath with a walk-in shower in a small bathroom?
In most cases, yes – especially if you rarely use the bath. A walk-in shower in the same footprint frees up 40-50% of the floor area and dramatically changes how the room feels. The only exception is if you are likely to sell soon and your buyer demographic expects a bath (families with young children, for example). In that scenario, consider keeping the bath and focusing improvements elsewhere.
What tile size works best in a small bathroom?
Larger tiles — 600 × 600 mm or bigger — are generally better for small bathrooms because they create fewer grout lines and less visual noise. Match the grout colour to the tile colour to maximise the effect. Small mosaics can work as an accent or shower niche feature, but avoid using them across the entire floor or wall.
Do I need a permit or planning permission for a small bathroom remodel?
In the US, most bathroom remodels do not require planning permission because they are classed as permitted development and take place inside the existing envelope of the building. However, any work involving electrics in a bathroom must comply with Part P of the Building Regulations and should be carried out by a qualified electrician who can self-certify, or notified to your local authority. If you are in a flat, check your lease before moving any drainage.
How long does a small bathroom remodel take?
A straightforward retile-and-refixture job with an experienced bathroom fitter typically takes five to seven working days. A wet room conversion or full strip-out with new waterproofing, tiling, and sanitary ware usually runs ten to fourteen working days. Add buffer time if you are coordinating multiple trades (plumber, electrician, tiler) yourself.
What is the best colour for a small bathroom?
Light, neutral tones – white, off-white, pale grey, soft sage – reflect the most light and make a small space feel airy. That said, a fully dark bathroom (charcoal, navy, deep forest green) can feel luxurious rather than cramped if the lighting is well-planned. The scheme to avoid is a sharp two-tone split at dado height, which cuts the room visually in half.
Should I use a contractor or DIY my small bathroom remodel?
Cosmetic work – painting, swapping accessories, replacing a mirror, adding LED strips – is well within DIY reach. Tiling is achievable with preparation and patience. However, anything involving water supply, drainage, or electrics in a wet zone should be handled by qualified tradespeople. Getting waterproofing wrong is the most expensive bathroom mistake you can make, and it may not show up until mould or structural damage appears months later.
Ready to Plan Your Kitchen Remodel?
Visit HSH Design Inc.
442 Main Street, Wilmington, MA 01887
📞 (978) 375-7685
✉ janet@hshdesigninc.com